
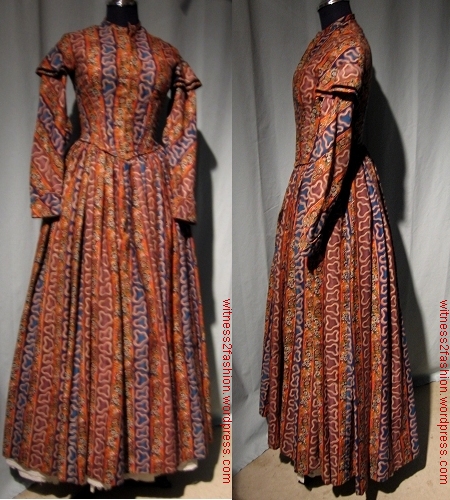
Printed wool challis dress, circa 1840s to 1850s. Private collection.
This is another dress I encountered while making an inventory of a friend’s vintage collection. I wish the photos were of better quality — at the time I had no idea of sharing them, and I was trying to work quickly. At first, I tried taking a picture of each garment, exactly as I found it, along with its assigned inventory number; . . .

Detail of dress bodice on padded hanger. I thought this fabric was amazing.
. . . then I realized that I needed to document their condition, which meant examining them inside and out. I found the inside and the outside of this hand-stitched dress equally fascinating. Even without proper petticoats or crinolines to inflate the skirt to its correct shape, this dress is impressive. The challis fabric is hard to photograph, but it uses complementary colors of intense greenish blue (possibly Prussian blue, which was invented in 1707) and burnt orange, with a reddish purple (madder?) in wide stripes. The abstract shapes on the stripes were, to me, quite unexpected, as is the large scale of the pattern.

Back of dress. The bold, vivid fabric is hard to photograph accurately, but these colors come close. The stripes were used symmetrically in front, but not in the back.
The waist and armscye seams are piped with narrow self-fabric cording, a detail I have seen on other dresses from the 1840s through the 1860s. Eventually I borrowed a mannequin from a dance studio. It was used for ballet tutus, and was very tiny, but even so, this dress was so small that I could not get it completely fastened.

Even a tiny mannequin used for ballet costumes had shoulders too broad for me to fasten the neck completely.
Although the picture below is blurred, you can make out the brass eyes used for the center front closing.

Center front has a concealed hook and eye closing. The eyes are visible.
The sleeves are cut on the bias. The sleeve cuffs are shaped and trimmed with a single, blue, purely decorative, fabric-covered button:

The sleeve opening (finger points to it) has very narrow facing; the decorative cuff is cut in a V shape, and bias bound. The blue button is purely decorative.
The inside of the dress is also very interesting and typical of period construction.

The dress turned inside out. Note the one-piece back, the wide hem facing and the period skirt construction; excess skirt fabric (right side out) remains inside the front waist.
Digression: Back in the 1970s I had a chance to examine another dress — probably from the early 1860s — which was constructed the same way. It had pagoda sleeves, and a wide hem facing like this. It was unforgettable, because the woman who made it had used good fabric everywhere it might show — including the lining in the lower part of the wide sleeves. But the broad hem facing and the lining of the sleeves above the elbow was made of tiny scraps of fabric, crazy-quilted together. Most of the scraps were less than two inches on their longest side, and they were obviously oddly shaped off-cuts saved from making other dresses. Imagine the labor! — and the pride that made her construct the dress perfectly while hiding her need to economize.
Back to this mid-1800s dress . . .

Piped seams outline and strengthen the waist seam and the armscyes where the sleeves are attached.
Above, the outside of the skirt, showing the corded piping where the skirt is cartridge pleated to the bodice.
Below, the inside waist of the dress. It is very characteristic that the fabric for the skirt was torn, not cut, to insure that it was on perfectly straight grain. Except for the CF opening, the skirt would probably have been stitched together, including the hem facing, before being attached to the bodice.

At left, you can see where some stitching holding the piping which binds the bodice has come undone. The skirt is cartridge pleated to the bodice binding. The hem length is adjusted at the waist, not near the floor.
A Dress “Hemmed” from the Waist
We are used to attaching a skirt to a bodice, and then adjusting the hem. That is not how it used to be done.
The woman making this dress would need an assistant. The skirt panels are sewn together on the straight grain, without being shaped into gores (that came later.) You make the bodice first, separately. To add the skirt, you have to be wearing all the underwear — corset, crinoline or hoops, petticoats, plus shoes, etc. — that you will wear with the dress. You tie a ribbon or string tightly around your waist, over the skirt, and with the help of your assistant, you tug the waist seam allowance up under the string, or your assistant tugs it down, making sure the dress is the same height from the floor all the way around, and that the fullness is evenly distributed. (It was probably gathered to the approximate waist measurement first.) The new waist seam position is marked, following the V front, the skirt is cartridge pleated following the new line, and then the cartridge pleats are stitched, one by one, to the bodice. Since the petticoats or crinoline will hold the dress farther away from the body over the hips and back than in the front, there will be extra fabric in front (even more than accounted for by the V of the bodice waist.) It was not cut off, but left hanging down inside the skirt, as you see here.

Inside of dress showing extra fabric at CF. You can also see that the front opening is boned. The brass hooks emerge through tiny holes in the fabric, similar to a corset busk.
This method of insuring that the skirt falls straight to the floor was used in earlier periods; the 18th century dress below, with its exaggerated hips supported by a pannier (“basket”) undergarment, was made by the same “adjust the hem from the waist” technique. It seems strange to us, but costumers who try to make a 1700s dress as if they were making a 20th century dress will find that they have created bizarrely curved hems that will not behave — and distorted the patterns on the fabric, too.

A British ‘Robe a la Francaise’ from the 1740s. Metropolitan Museum.
Back to the 19th Century Dress
Another reason I love “our” mid-1840s dress is the padding in the bodice. It’s not necessarily there to make the wearer look more full breasted (but it does.) The dropped shoulders of early Victorian dresses created problems. They limited movement (and “our” dress has a mended tear at one armhole to show the result of suddenly raising an arm.)

A tear under the arm was neatly repaired. Even the cording wasn’t strong enough to prevent this tear.
The area inside the shoulder also tended to cave in and wrinkle unattractively. Put your hand on the front of your shoulder, and draw it across to your breastbone. There is a deep hollow between the roundness of the shoulder and the beginning of the ribcage, which caused the “dropped shoulder seam” dress to wrinkle there. (Click here to see an example on Pinterest.) The early Victorian corset which pushed the fullness of the breasts abnormally high made the problem worse.

I saved this image, but wasn’t able to find it again for a link! The top edge of her corset is all too visible, as are the shoulder wrinkles.
In grad school I had been told that women sometimes solved this problem by padding their dresses to fill in the “hollow.”
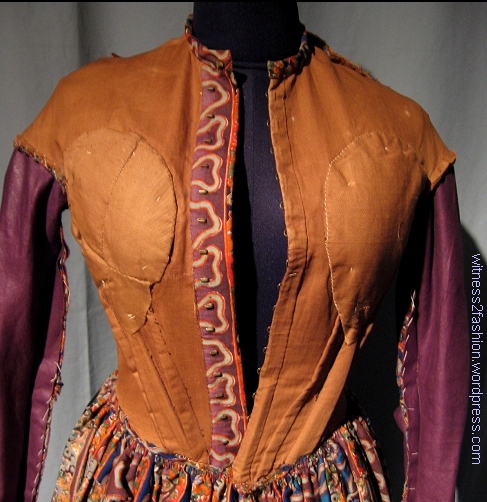
These bust pads help to fill in the hollow between the shoulder and the ribcage, as well as softening the line at the top of the corset.
I was happy to see this example!
[Added 8/26/15: The inside of another early Victorian dress, is a light summer plaid fabric, can be seen by clicking here.]
I also fell in love with a petticoat from roughly the same period.

Yards and yards of hand-embroidered eyelet and hand-stitched tucks on a Victorian petticoat. That many tucks would stretch the patience of a machine stitcher, but by hand? Just thinking about it makes my fingers ache.

This hand embroidery went on yard after yard. Detail of petticoat.

A close-up: one of many hand-stitched tucks.
This petticoat was not in very good shape — whenever that scalloped embroidery got stepped on, in many years of use, it tore. But I knew it was very, very old when I saw the tell-tale fabric inside its waist.

Center front is at left; the hem has been adjusted from the waistband, not the bottom. The embroidery at the bottom of the petticoat was done first. The waistband had been torn and crudely repaired in several places.
You can see a good illustration of cartridge pleats (scroll down to the pink plaid dress) in “Deconstructing History” at tragic-fishcakes. blogspot.com An equally large scale printed dress from the 1850s can be found at All the Pretty Dresses (click here.)
A Note on Dating This Dress: Although it was remarkably unfaded and free of moth holes, this dress appears to be entirely hand stitched, mostly using tiny backstitching and some whipstitching.
The style suggests 1840s, although it doesn’t have a fan-front bodice; (this similar dress is dated 1845) but in a rural area this dress might have been made in the 1850s or even later. The bias sleeves are seen on several 1840s dresses. I hope this dress has found a new home with someone with the expertise to research the fabric (my friend thought it was roller printed wool challis) and date it more definitively. My guess is mid-1840s or early 1850s, but that is only a guess.

I truly love that you the insides of garments and constructions details and links to other blogs and types of information. Fascinating and fantastic. A class in every blog post! I will be attempting an all-white Victorian tea dress and undergarments next. Any pattern suggestions would be most welcome!
I have not used many of them, but Past Patterns has a good selection of Victorian corset, underwear, and dress patterns, from early Victorian to late Victorian. (I have made some blouses from Past Patterns, and appreciate their wide range of sizes.) An extraordinary online resource is The Great Pattern Review from the GBASC (Greater Bay Area Costumers Guild.) You can read reviews of hundreds of re-recreation patterns there, and see photos of the finished garments. Click here. It’s a searchable resource. Let me know when you’re ready to share your results! Happy Stitching!
Thank you!
How fascinating! And I love the fabric.
Oh the details! Thank you so much for sharing!
My pleasure!
This is a beautiful example of printed wool challis which was a very high end fabric at the time. The print technique might be block or a combination of roller and block. The printed wool challis was possibly imported from France or England.
I’m glad to have the owner’s opinion of the fabric confirmed. Thanks!
I love reading your posts! Thank you 💝
I rarely ever see dresses of this age, and know little about the construction techniques used before 1915, so I really enjoyed reading your analysis of this dress. Thanks!
Pingback: 1920s Middy and Skirt in Lavender | The Vintage Traveler
My current project is recreating an 1845 dress with a bit od whimsy added to it. Thank you for sharing your insight. I have done some research on this, but have never noticed the bust pads or center front hook and eye placement until I read this post. I will be using these elements in my dress. Thank you.
Pingback: Early Victorian Fan-Fronted Dress, Inside and Outside | witness2fashion
I agree with Lynn – the fabric is sensational. A very interesting post.
Pingback: Sailor Moon in the 16th Century | Morgan Donner's Sewing Party
Pingback: Victorian Flounced Skirt and Pagoda-Sleeved Bodice, circa 1850’s (?) | witness2fashion
Pingback: Some (Surprising) Smocked Vintage Garments | witness2fashion
Finally! Thank you for the excellent explanation of how the skirt was fitted and attached to the bodice. How exciting to find this excellent source. Hurray!
That method was also used for the “pannier” dresses of the 1750s, etc., so it wasn’t unique to the 19th c. For meticulous scale drawings and patterns, very detailed, intended for people who sew, Janet Arnold’s book Patterns of Fashion 1 (1660 -1860) and Patterns of Fashion 2 (1860-1940) taught me a lot. PoF 2 is offered on Amazon for outrageous prices, but I just found one copy on eBay here. (date of this reply is 3/21/20)
Pingback: One Pattern to Rule them All: Making a “Jane Eyre” 1840s Dress from Simplicity 3723 – The Pragmatic Costumer